We were sitting at a set of traffic lights on Fremont Blvd on our way to an Indian hole-in-the-wall for a Dosa, behind an old Acura Integra and beginning to notice a smell of burning oil. I'm usually over-paranoid and always blame fuel and oil smells on the Opel, much to Jo's amusement, as generally it's someone else. Of course, this time I decided to skip the derision and blame the Integra.
Jo agreed, it had to be the Integra because, as soon as it got further away from us once the light went green, the smell went away. Simple. Bloody cars should be off the road...
Paranoia returned when we got to the restaurant and I sniffed the engine. Yup, burning oil. Crap, and tomorrow was a 100+ mile journey down to Laguna Seca for Jo's driving course.
I couldn't wait to get home and find the problem as I was expecting another weekend of rental cars. Jo couldn't wait to get home either as my conversation was mostly of what could be wrong with the car!
Back home we found the source of the smell - there was a nice brown streak along the bottom of the downpipes. At least it wasn't oil from a cracked gearbox casing from the off-road excursion.
On the topside of the engine I could see the problem, all around the valve cover it was black with oil, and the oil had leaked down the sides and back of the engine, making the bellhousing black too. The other thing I noticed was that the rearmost exhaust manifold bolt was missing, and that might explain some of the vibrations we'd been getting from the engine.
First course of action was to get the valve cover off and replace the gasket, as that must be the problem. I'd had slight leaks off the back of the valve cover ever since we put the 2.4 in back in 2002, but I thought I'd finally fixed that about a year ago... clearly not. I had the front left screw off (the one that holds the spark plug wire router on) and I was pulling off the one behind it when I realised the screw was loose. So was the back one behind that. and the rear one on the other side, and...
Yup, they were all loose, so loose that we had a slow oil leak that had just spread over a period of a few days until we noticed it as it hit the exhaust.
The problem with the 2.4 is that it's a bit of a buzzy engine. We had this one balanced, but I think I'll pay for the 0.1g tolerance next time as we've had a lot of screws loosening up over the 7 years it's been in. I had a case last year where the alternator bracket screws loosened off and the alternator stopped charging due to the poor ground that resulted, and the lost manifold bolt was another example.
Anyway, back with the Manta and I had the screws tightened up and Gunk out pretty quickly. We cleaned it off and dried the car and I've just returned from a long (7-8 mile) trip round the block to see if it's cured, and so far, touch wood, there's no signs of oil. Even if there's a slight leak still, it'll hold for the 200 mile weekend run and I'll replace the gasket on Sunday after the Grand Prix.
The interesting thing is that the slight vestiges of idle hunting has finally gone away. If you remember the last California Column in Manta Magic I was talking about my coil grounding problem, well that mostly fixed the weird idle effect, but lately it was more noticable again, especially returning to idle where it would drop to about 500 rpm before picking up. On the brief test drive that seems to have completely gone now.
I guess that's reasonable. If the valve cover was loose enough to let oil pour out, it was also loose enough to allow air in, and that constitutes an air leak, as that air could get into the intake through the PCV hose. Now the air leak's gone, the random weakening of the mixture would have stopped and the idle could stabilise again.
I wonder if it will stop the car starting on 3 cylinders too?
Wednesday, October 28, 2009
Saturday, October 24, 2009
Tyres and shrubbery
I think I told some of you, but one of us backed the Manta over a kerb on an on-ramp and ended up in the bushes the day after the first rain of the season. I guess these things happen, but it would be nice if it didn't happen to us...
Actually, if truth be known, I'm thinking it might be the new tyres. I've bored most of you to death in the past about tyre compounds, but I really think this time it was down to those. We have a weird tyre size on the Manta at the moment (205/55x15) and, especially here, it's difficult to find anything decent in tyres for wheels smaller than 16". If I changed to the more normal 205/50x15 I'd be better served, but the Manta just doesn't ride well on 50 series tyres, not surprising for a car designed in the early 70's.
We used to be lucky, our first tyres on these wheels were Bridgestone S-03 Pole Position, and superb tyres they were too. They wore so quickly that they almost left black lines behind you, but they gripped way more than either of our abilities. And what was funny for summer tyres, they gripped in the cold and wet almost as well as they did in the heat of the summer. We've still got sets on the GT and Jo's Manta in England, but unfortunately they're the last of the line as Bridgestone don't seem to care much about cars with 15" wheels anymore.
Our next try was Michelin Pilot Exalto PE2's, and we've got those on my silver Manta in the UK. Not as grippy as the Bridgestones, but pretty decent tyres, all in all. Of course, you can't get them in 205/55x15 over here.
But about six months ago I needed new tyres for the Manta here, and went to Tirerack as normal. Choices were severely limited, to say the least, with only a handful of tyres I'd consider buying. The best of the reviews was the Yokohama S.drive, but I'd not had much luck with the old AVSes in the wet in the past so I wasn't rushing to order a set. Still, the reviews said they were OK and after checking other online tyre retailers I realized they were pretty much my only option (all the others had wear ratings that meant I'd never weat them out!), so I bought a set.
They're definitely OK in the dry, which is what they're advertised as, but they really don't like gripping much in the wet. Straight after the shrubbery incident I took the car round the block to make sure everything was OK, and it definitely liked losing grip at the back end a lot more than I remembered. Not too bad, I suppose, if you can catch the back end before things get too bad, but if you can't it's a visit off-road or worse.
I think I'll try a set of 205/50x15 on the Manta when these wear out. I really love Bridgestones these days (we have 225/50x16 RE050A Pole Positions on the Monza) and they've brought out a new tyre called the RE-11 which is available in the right size. The wear rating's a lot better too - 180 for the RE-11 vs 300 for the Yokos.
Oh, and we're doing something about catching slides too - we're off to Laguna Seca for a handling course next weekend! Pictures and story to follow.
Wednesday, October 21, 2009
Hot buns
We've got new Recaros in the project Monza, but the ones in the Monza we're restoring are at least 100,000 miles old because we bought them used and the car's done that distance with us. We got them in England so the driver's seat was pretty good (it was the UK passenger seat, right?), but after a pair of averagely hefty Californians had used them for 10 years they're sagging nicely.
While we've got a great guy in the UK to do our upholstery (Darren at Suffolk County Mantas), we've not had any luck with auto upholsterers in this country. There was one guy in Redwood City but he couldn't even finish a steering wheel recover in 9 months (we just gave up on him), so we just soldiered on with the seats the way they were.
I few weeks ago I went looking for a local Recaro agent as I remember someone telling me a while back there was one in the Bay Area. I finally found Sid's Custom Upholstery. It sounded an awful lot like Gabe's Custom Upholstery of American Hot Rod fame, but I thought I'd give him a try anyway.
Sid (real name Hugo Sanchez - go figure) gave us a warm fuzzy feeling so we dropped the seats off with him a couple of weeks ago for a re-cushioning and new strapping under the seat. I also remembered to ask for seat heaters to be added as the Monza's original leather armchairs had them and I've preserved the wiring. It's not really cold enough in California to warrant it, but they did come in useful when we drove the car up to Lake Tahoe in a snowstorm so you never know.
We got the seats back last week, complete with seat heaters, and a nice job it seems to be. It was fun trying to get Jo out of them while I had her checking them out for height! Then the problem of how to finish them off began. Opel just put in simple heating mats that take 12V and convert to a nice warm feeling. These mats were a little more flash, with a built-in thermostat and two temperature settings (38C and 41C). The question was where to put the bloody temperature switches...
Seat base showing the wiring. The block of wiring at the top is the thermostat controller

First idea was the centre console, but it's getting so busy there now that we didn't really have the space. I thought of the side of the console (either side of the gear lever) but Jo said that was a little funky and I have to agree. We discounted the door / armrest (way too much wiring to squeeze through the door) and finally settled on the seat console. Pretty obvious when you think about it - it affects the seat so why not put the switch on the seat?
So I've done one seat so far, and you can see it below. The dash mounted switch turns heating on and off as per Opel's original design, but now the switch on the console chooses heating level I or II for each occupant individually.
View of the seat console with the switch mounted in it. We thought it might be a stretch to reach down to it but it actually worked out OK.

I should start a pool to bet on the final weight of the car with all these bloody options in! It actually does matter - allowable California emissions is calculated using the weight of the car as a factor. The heavier the car the lower the allowable emissions... :-)
We tried them out the other night and you could definitely feel heat coming through, but it wasn't earth shattering heat with either setting. I'm running the car off the battery only at the moment (of course) so it might be that it's not that impressive with just on 12 of the 14 Volts the controller is expecting. I'll put it on the charger at the weekend and try it again.
Tuesday, October 20, 2009
Welcome to the 21st century, the email list is no more. :-)
Even though we're well into the rebuild of the Monza now, I thought I'd start the blog off with a post I put on the Autobahnstormers forum last weekend, at least it's a good intro for anyone else who happens to come across the blog in the future.
About 18 months ago I started noticing the car wasn't having a good time. The left front tyre was wearing badly on the inside edge, the bonnet was beginning to have a V shaped gap between it and the left wing and the left (driver's) door was starting to touch the B pillar at the top. I couldn't work out what it was until I moved a wiring loom on the top of the left inner wing, between the strut and the outside edge, and saw a split. A little more investigation and I noticed that the spot welds that hold the brace (runs from the strut tower area to the door pillar) to the inner wing were pulling off too. In fact, the front suspension was being held up by the wing rather than the brace!
The car got parked up and a brief 9 months of denial followed, during which time we used our Manta every day.
Eventually I took the car over to the local body shop and they agreed to do the work. The only problem was that they needed pretty much everything north of the A pillars taken off the car to be able to get to the inner wing to do a proper job (TM), so that meant a lot of dismantling.
You're probably putting 2 and 2 together by now and working out how to match the title and the last paragraph, right? Yup, there were a load of projects I'd been holding off for years because we used the car every day and because each one of them needed more than a day's work. With one thing leading to another here was an ideal opportunity to do the lot at once. Here's the list:
So a couple of weekends of dismantling and it was off to the bodyshop again, with a trail of power steering fluid coming from it because the steering box was about the only thing left in the car!
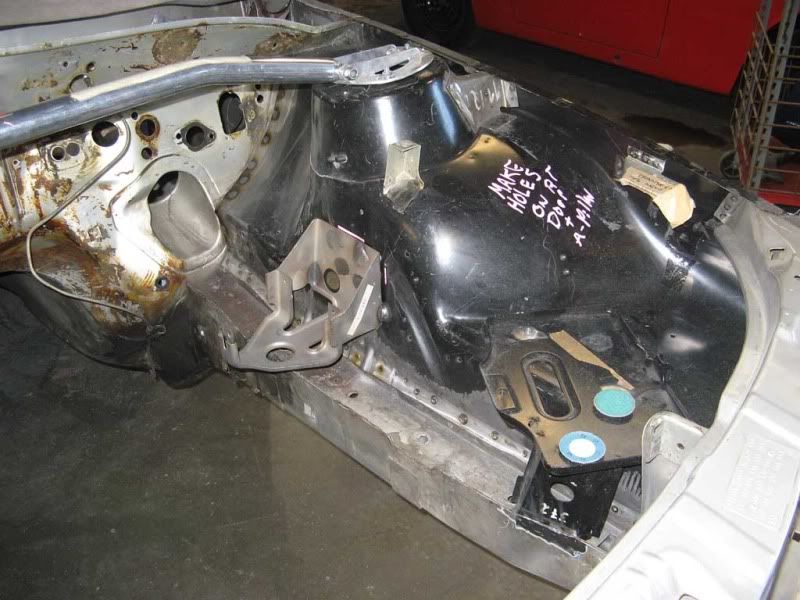
Here’s the inner wing off the car. You can just make out the brown line outboard of the label on the strut tower and the tear in the side next to it.

At the bodyshop with the new bits attached. Luckily I had a strut brace they could use to hold the whole lot in the right orientation.
A few weeks later I had it back in the garage and the long slow reassembly started. First off was a brand new firewall insulation mat that I’d scored off OCP. It’s not the exact right one for the car (it was for a Diesel Senator) but it modified easily and really made the car look new. At that point, any chance for a quick rebuild disappeared and it started to be a full-on restoration!
Insulation just held in place with nuts and bolts. Looks good, though, doesn’t it?

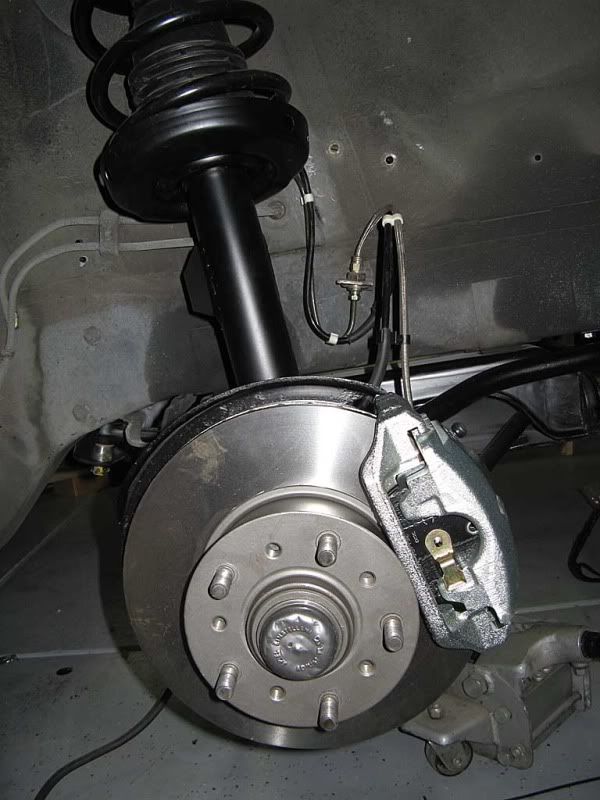
A short while later and I’d got it modified to suit the car. Power steering, pedal box and braking system were next to go in.

See how bad it got? EVERYTHING is being cleaned and painted or renewed
As I said, it’s getting really bad now. Since I was in full-on restoration mode everything started coming out of my stock to make it look perfect. Things were either cleaned and painted or brand new bits were used. I’m also a sucker for cad plating, so all the plated parts were painted in clearcoat to keep them that way!
I got a little fed up doing the engine bay so I moved onto the inside to keep the interest up. I’d removed all the insulation when I dismantled it as it was either brittle and had fallen apart or would have done so when I put it back in. I’m also a sucker for Dynamat (I used it on the silver Manta that Andy Clears restored for me) so I got a load more and started on the Monza.
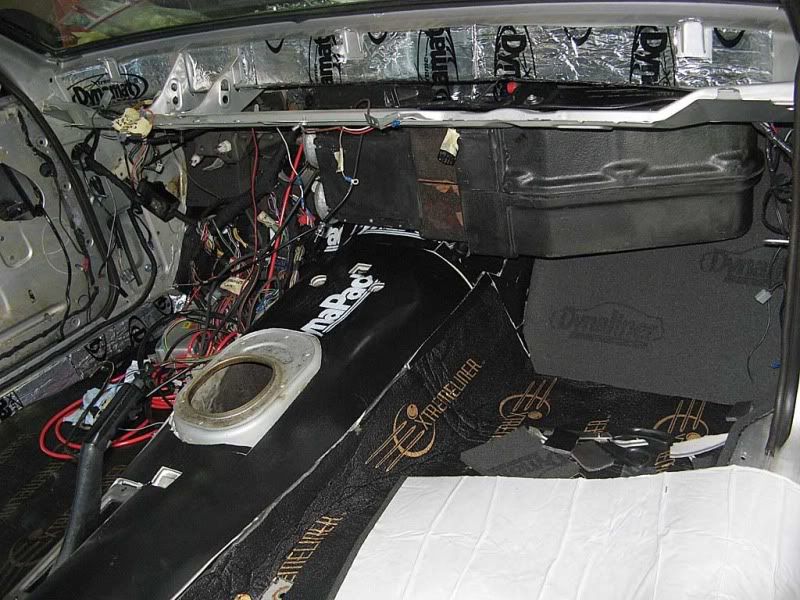
First layer of Dynamat

Second layer of Dynamat and then the A/C system and wiring could start
My car was used as a demonstrator for a chap who was going to import them into the USA so it has absolutely every option available for 1983, and every option needed wiring. Yup, it was going to be epic.
First off was the injection loom. Previously the car was just a simple 3.0E with a home made oxygen sensor add-on box to keep me legal over here. Now I had ABS and a different injection system to use. The major choice was which injection system. I hummed and haa’ed about it for a long while until a friend of mine in the Netherlands (Louis van Steen) called Irmscher for me and found that they had one last C36NE ECU and I could have it for a nice price too.
Well, that solved all the problems since there’s nothing easier than just assembling bits that were meant to go together, right? Pretty much. But I now had an automatic C30NE (Gold Top) wiring loom and a Monza 3.0E Jetronic wiring loom for cars with ABS to blend together. Luckily I’m not at all worried by wiring so I spent a “fun” weekend in the garage, stripping the two looms and making one new one out of it.
The problem was, now I had a nice new looking loom sitting in the engine bay, all the other looms were looking decidedly down market, so I ended up stripping and rewrapping most of the looms in the end.
Engine bay with most of the new looms in place

Back inside the car I started on the alarm wiring. I’d bought a Toad Ai606 in the UK a while back as I had them on the Mantas in the UK and they work pretty well (although Andy didn’t think so when the one in my black Manta went off half a dozen times outside his house one night!). Like this post, that was one of those epics that seemed to go on forever and I must’ve put a good three or four weekends into it. Still, finally I got it in and the new dash could go on and it started looking more like a car again, rather than a box of bits.
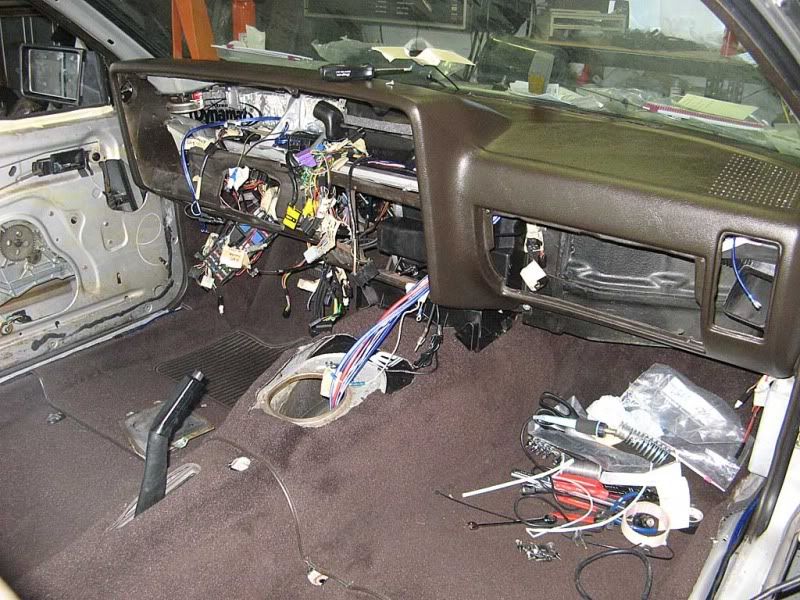
Finally got the dash on
The car had tinted side and rear windows when I got it, but I wanted to change it over for something a little better and so had the sides tinted with 3M Crystalline film. You can’t see it on the car but it makes one hell of a difference in the sun. I’ll get the front and rear done when the car’s drivable. Anyway, last weekend I decided to build up the doors, so the glass went back in (carefully, it’s got a scratchable film on the inside!) and then I spent an inordinate amount of time cleaning, re-greasing, Dynamatting (of course) and refitting. And of course there was the ever present wiring – the doors have electric mirror and window wiring and I have tweeters on the front corners of the door.
Would you believe you could spend several hours getting a door built up?

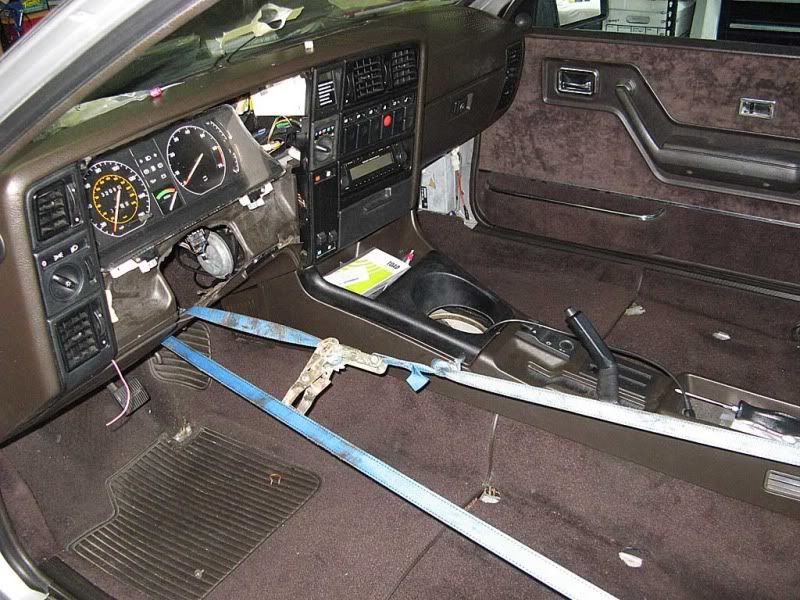
So that brings me pretty much up to date. The last thing I did last weekend was to test fit the centre console and of course had a problem. The console wouldn’t fit under the dash and when I had managed to force it there the angle of the bottom of the dash didn’t match the angle of the top of the console. I think I’ve finally worked it out. The dash was put in with the windscreen in place, so it probably isn’t fitting as far forwards as it was originally. Since the dash is held onto the dash panel by a couple of screws, that means it has rotated downwards compared to where it should be, and that’s why it’s too low and the angle of the bottom of the dash is wrong. Add that to the thickness of the Dynamat I’ve used and you can see it wasn’t going to fit.
A quick engineering solution was to use a strap with a ratchet on the bottom of the dash to pull it upwards and outwards. I’ve left it under tension for the week and it does look like it’s getting better. Over the weekend I’m going to get the instruments back out and loosen off the nuts holding the top/front of the dash below the windscreen and hope that I can muscle it back in place with a bit of grease and a plastic scraper. Still, I thought you’d like to see the lash up with the ratcheting strap… :-)
An engineering solution to the problem…
More when I’ve got some time.
Even though we're well into the rebuild of the Monza now, I thought I'd start the blog off with a post I put on the Autobahnstormers forum last weekend, at least it's a good intro for anyone else who happens to come across the blog in the future.
About 18 months ago I started noticing the car wasn't having a good time. The left front tyre was wearing badly on the inside edge, the bonnet was beginning to have a V shaped gap between it and the left wing and the left (driver's) door was starting to touch the B pillar at the top. I couldn't work out what it was until I moved a wiring loom on the top of the left inner wing, between the strut and the outside edge, and saw a split. A little more investigation and I noticed that the spot welds that hold the brace (runs from the strut tower area to the door pillar) to the inner wing were pulling off too. In fact, the front suspension was being held up by the wing rather than the brace!
The car got parked up and a brief 9 months of denial followed, during which time we used our Manta every day.
Eventually I took the car over to the local body shop and they agreed to do the work. The only problem was that they needed pretty much everything north of the A pillars taken off the car to be able to get to the inner wing to do a proper job (TM), so that meant a lot of dismantling.
You're probably putting 2 and 2 together by now and working out how to match the title and the last paragraph, right? Yup, there were a load of projects I'd been holding off for years because we used the car every day and because each one of them needed more than a day's work. With one thing leading to another here was an ideal opportunity to do the lot at once. Here's the list:
- The dash had loads of cracks on it and I had had one recovered a while back down in LA (http://www.justdashes.com/HowWeDoIt.htm). It's a pig of a job with all the wiring on the Monza so I'd decided to wait for an opportune moment.
- The heater had started to gurgle strangely. I'd assumed it was just hard water choking the flow, but to change it needed the dash to come out...
- I had a 3.6 crank, rods and pistons sitting in the garage and the engine had done 240,000 miles.
- I wanted to convert the car to use ABS, but that was a big job to do by itself.
- I also wanted to convert the car to use either the Monza catalyst injection system or the one off the Gold Top Senator to try to help me through the emissions tests here, but that would have to be done with the ABS since they share the same loom
- The seats needed re-foaming and re-strapping. I'm probably most kindly described as a lardy-arse (lived in California too long) so 100,000 miles with me driving hadn't helped the Recaros.
- And on and on
So a couple of weekends of dismantling and it was off to the bodyshop again, with a trail of power steering fluid coming from it because the steering box was about the only thing left in the car!
Here’s the inner wing off the car. You can just make out the brown line outboard of the label on the strut tower and the tear in the side next to it.

A few weeks later I had it back in the garage and the long slow reassembly started. First off was a brand new firewall insulation mat that I’d scored off OCP. It’s not the exact right one for the car (it was for a Diesel Senator) but it modified easily and really made the car look new. At that point, any chance for a quick rebuild disappeared and it started to be a full-on restoration!
Insulation just held in place with nuts and bolts. Looks good, though, doesn’t it?
See how bad it got? EVERYTHING is being cleaned and painted or renewed
I got a little fed up doing the engine bay so I moved onto the inside to keep the interest up. I’d removed all the insulation when I dismantled it as it was either brittle and had fallen apart or would have done so when I put it back in. I’m also a sucker for Dynamat (I used it on the silver Manta that Andy Clears restored for me) so I got a load more and started on the Monza.
First layer of Dynamat
My car was used as a demonstrator for a chap who was going to import them into the USA so it has absolutely every option available for 1983, and every option needed wiring. Yup, it was going to be epic.
First off was the injection loom. Previously the car was just a simple 3.0E with a home made oxygen sensor add-on box to keep me legal over here. Now I had ABS and a different injection system to use. The major choice was which injection system. I hummed and haa’ed about it for a long while until a friend of mine in the Netherlands (Louis van Steen) called Irmscher for me and found that they had one last C36NE ECU and I could have it for a nice price too.
Well, that solved all the problems since there’s nothing easier than just assembling bits that were meant to go together, right? Pretty much. But I now had an automatic C30NE (Gold Top) wiring loom and a Monza 3.0E Jetronic wiring loom for cars with ABS to blend together. Luckily I’m not at all worried by wiring so I spent a “fun” weekend in the garage, stripping the two looms and making one new one out of it.
The problem was, now I had a nice new looking loom sitting in the engine bay, all the other looms were looking decidedly down market, so I ended up stripping and rewrapping most of the looms in the end.
Engine bay with most of the new looms in place
Back inside the car I started on the alarm wiring. I’d bought a Toad Ai606 in the UK a while back as I had them on the Mantas in the UK and they work pretty well (although Andy didn’t think so when the one in my black Manta went off half a dozen times outside his house one night!). Like this post, that was one of those epics that seemed to go on forever and I must’ve put a good three or four weekends into it. Still, finally I got it in and the new dash could go on and it started looking more like a car again, rather than a box of bits.
Finally got the dash on
The car had tinted side and rear windows when I got it, but I wanted to change it over for something a little better and so had the sides tinted with 3M Crystalline film. You can’t see it on the car but it makes one hell of a difference in the sun. I’ll get the front and rear done when the car’s drivable. Anyway, last weekend I decided to build up the doors, so the glass went back in (carefully, it’s got a scratchable film on the inside!) and then I spent an inordinate amount of time cleaning, re-greasing, Dynamatting (of course) and refitting. And of course there was the ever present wiring – the doors have electric mirror and window wiring and I have tweeters on the front corners of the door.
Would you believe you could spend several hours getting a door built up?
A quick engineering solution was to use a strap with a ratchet on the bottom of the dash to pull it upwards and outwards. I’ve left it under tension for the week and it does look like it’s getting better. Over the weekend I’m going to get the instruments back out and loosen off the nuts holding the top/front of the dash below the windscreen and hope that I can muscle it back in place with a bit of grease and a plastic scraper. Still, I thought you’d like to see the lash up with the ratcheting strap… :-)
An engineering solution to the problem…
More when I’ve got some time.
Subscribe to:
Posts (Atom)